|
PREPARATION
Who says that plucking your eyebrows has to be painful!
To avoid any swelling and redness, try plucking your eyebrows a little at a time. Work slowly in stages.
Here are a few helpful hints on easing the pain...
- Numb your eyebrows by rubbing them first with baby's teething pain preparation.
- Before plucking, soften your eyebrows with shaving cream or hair conditioner.
- Lay a hot wash cloth over your eyebrows for two or three minutes before plucking.
- Take a steamy shower first (this will open the pores and make plucking easier).
- To help relieve any skin irritation, apply warm petroleum jelly to your eyebrows after plucking.
SHAPING
The first thing to do in shaping your eyebrows is to decide where they should begin and where
they should end. This you can do in 2 easy steps with the aid of a pencil.
1} You hold the pencil vertically along the side of your nose. Where the pencil meets the eyebrow
above the nose should be where your eyebrow begins.
2} You line the pencil up with the edge of your nose and tilt it diagonally until the point meets
the outside corner of your eye. This is where your eyebrow should end.
When you begin tweezing your eyebrows, start first by cleaning up the area between them. Pluck
any stray hairs here first, then tweeze any that are underneath your eyebrows. I find that this creates a nice natural arch.
Beautifully shaped eyebrows act as a frame to set off your eyes, it's fair to say that your eyebrow shape,
can make or break your look.
The easiest way to shape your eyebrows is to take a white eyeliner pencil and color in the areas directly
under your eyebrows which you feel need to be plucked. Then, simply tweeze away the hair in these whitened areas.
The best part about this method is that if you don't like the shape you've drawn with the pencil, you can
always wipe it off and redraw it before you actually start any tweezing!
Shaping your eyebrows various ways can offset or highlight certain facial features. If your face
is:
- OVAL - slant your eyebrows slightly upward at the ends. This will "open up" the upper part of your face.
- HEART-SHAPED - Let your eyebrows form a rounded arch. This will make your face appear less angular.
- SQUARE - Eyebrows should arch directly above your pupils. This will soften your facial contours.
- ROUND - Eyebrows should never extend beyond the length of your eye. Longer brows tend to widen your face,
not narrow it.
Hints for creating mistake-proof eyebrows every time:
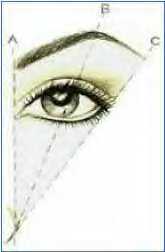
A} Stand in front of the mirror, look straight ahead. Imagine a straight line from the base of your nose
to your eyebrow. First, imagine the line straight up from the outside base of your nose to the eyebrow line; ideally, that's
where your eyebrow should begin.
B} Looking straight into the mirror, imagine the line slanting across the center section of the eye,
to the right of the pupil. That's where the arch should be.
C} Imagine your line angling even further, straight past the outer corner of the eye. That's where
the end of the ideal eyebrow line should be.
Remove hairs with a pair of tweezers, working from underneath the eyebrow, even up and clean the line. If
the line of the natural eyebrow stops short of the outside corner, point C, use a sharp eyebrow pencil to draw a thin, delicate
line to extend the eyebrow line to the outside of the eye. Blur the color, lightly with a fingertip. To raise the arch of
the eyebrow higher, tweeze hairs from just below where you want.
The best tweezers are slant-edged, with a slightly textured, point that grabs the hair easily. You shouldn't
need to yank to pull the hair. Replace tweezers every 2 to 3 years or when they get dull and lose their grip. Keep tweezers
clean. Dip into a little antiseptic or alcohol and dab over the area before and after tweezing. Ideally try to pluck in the
evening, cleansing your face, before bedtime, this will allow any redness or puffiness to go down before morning.
Shaping your eyebrows beyond basic grooming is best done by a professional. Once you get the shape you want,
you can to maintain it with regular trimming yourself.
Color & Lightening
Always choose an eyebrow color that matches or compliments your hair color and skin tone.
Try natural-looking eyebrows during the day and strong, dramatic eyebrows for evening. If you make a dramatic
change in the color of your hair, lighten or darken your eyebrows accordingly. Experiment with a few shades to find your best
look. Perfectionists can even blend 1 to 2 colors together for a custom effect.
Bleaching the eyebrows to a warm chestnut shade creates needed contrast with dark skin tones. Women who
go from dark brown hair color to light blonde will also find that lightening their eyebrows will give them a more natural,
born blonde look.
FILLING IN YOUR EYEBROWS
If your eyebrows are sparse in spots, here is a really cool and easy way to fill in your eyebrows in 3 easy
steps:
1. Comb your eyebrows in the direction in which they grow (this way it is easier to see the natural line
of your eyebrows and where they need to be filled in).
2. Use two pencils (one a shade lighter than eyebrows and one a shade darker). Use alternating shades to
fill in eyebrows, working outward from the center, then inward from the center.
3. When finished, brush eyebrows back into place. Use upward strokes. TIP: Use a stiff little eyebrow brush
(this will help soften and shade the eyebrow pencil coloring to make it look more natural.
IMPORTANT: Always use light, feathery strokes when filling in your eyebrows. Being too heavy-handed will
leave your eyebrows looking hard and unnatural.
Styling Thicker Eyebrows
1} Using a white eyebrow outlining stick, mark where you want your eyebrow to begin and end.
2} Using an eyebrow stencil (optional), place the stencil in position, lining up the inner corner
of the stencil with the white mark you have made.
3} Using an eyebrow dual comb/brush combo, brush the hair through the stencil hole following the
shape of the stencil. This step is important. This makes the hair follow the shape you want.
4} Using the white eyebrow stick, follow the outline in the stencil.
5} Using slanted tweezers or eyebrow razor, remove only hairs outside the white area.
6} Using eyebrow powder, eyebrow gel.
Remove white outline. Place the stencil back on,
a tiny amount of brow gel is placed on the eyebrows. The eyebrow brush/comb is used to comb the eyebrows as in
step 3. Powder is brushed over the tail area to touch up the tail very slightly. Remove the stencil.
For very thick or coarse eyebrow hair, hair spray can be sprayed on the brush, (in place of brow gel). Place
the stencil back on and brush the eyebrow hair through the stencil hole. (same as above).
7} Using an eyebrow defining pencil, a block inner corner was desired for a finish. The eyebrow
pencil very lightly outlined the entire eyebrow. This brings slightly more definition to the shape.
Take away the transformation easily. Eyebrow gel, eyebrow definition pencil, eyebrow powder and a combed
eyebrow are all removed. The eyebrow was simply washed with a face cloth to "roughen up" it's appearance. The missing hairs
don't make the eyebrow look feminine. Hair removal methods can include waxing, threading, or tweezing.
LETTING YOUR EYEBROWS GROW OUT
If you change your mind about the shape of your eyebrows, you might have to let them grow out before you
can reshape them. Sometimes the stubble which develops while they're growing out can be somewhat unsightly. To camouflage
the stubble, take a small brush and paint facial hair bleach, onto the little hairs. This will disguise the stubble until
your eyebrows grow back and you're ready to reshape them.
Some Tips & Tricks
Recreating your eyebrow shape is not as hard as you may think. It takes a bit of practice but it's well
worth the effort (as many beauties already know). Look at your eyebrow in sections. Where you have little eyebrow hair (example:
in the tail area) fill in with powder. Powder on skin looks more natural. Where you have lots of eyebrow hair, color
those sections with the color touch up pencil. The pencil transfers color without adding heaviness to the eyebrow. Go lightly
and blend with the eyebrow comb.
Select new eyebrows that were one step away only from the starting eyebrow. For example, from moderate
arch to flat, from moderate arch to high arch. Don't try to go to a high arch from a flat eyebrow. From medium thickness
to thick and thin. Don't try ultrathin. Thick to ultrathin, for example, would have been too far a stretch without removing
hair.
Use an eyebrow powder color similar to the hair color. This makes it as hard as possible for anyone to tell
where the hair line ends and new eyebrow area begins.
If your eyebrow hair is very long consider using scissors or a beard trimmer to trim your hairs to a good
length. This will prevent you from trimming them too short where they become unmanageable.
Hairspray sprayed on the brush, not directly on the eyebrow, will hold the eyebrows firmly in position.
Problem...You decided to wax your own eyebrows because you liked the look when you had it done
and figured "what the heck, I can do it myself and save a few bucks." The wax dripped where it shouldn't have and
when you went to take the wax off, Oops, half the eyebrow went with it...The bad news is-you're frowning, the good
news is, no one can tell since you have no eyebrow...
Solution...Spend the money next time will ya? Eyebrow waxing is so precise, it is a tricky procedure
when someone is doing it for you and you are laying back, let alone trying to look in a mirror and worrying about
getting it in your eye, burning your eye with too hot wax, and not being coordinated enough to do it in the first
place. Oh yeah, what to do...Since the mini-lecture is done, here goes...You might run for the eyebrow pencil and
try to draw a pretty eyebrow, but frankly, if you were that artistic, you wouldn't be missing part of your eyebrow now
would you? Get an eyeshadow in a color closest to your brow and brush it in the areas that are thin or bald until the
new brows grow in. I personally think tweezing is much better solution than waxing for the eyebrow area. You can
control what gets removed easier and boo boos that happen aren't quite as disasterous. Another option is a brow
mousse or brow wax. These actually plump up the hairs that are still there and shade in areas that are missing.
Look for these at almost any drugstore or makeup departments in finer stores...
The "smoky look" on eyes isn't just for evening and isn't
limited to the color black. Charcoal, teal,
navy, olive,
and maroon work well also to give that sultry look. Here's
an easy 3-step way
to get the look...
1...Define your upper lash line with a soft black pencil,
working from the inner corner of the eye to
the outer corner
of the eye.
2...Soften the line you just did with a flat-tipped brush...
3...Brush the darker shadow that you choose onto the eyelids
from the lash line to a little above the crease.
Soften the
edge of the crease with a slightly lighter shadow than the
one you're using. If
you want your eyes to pop out more, use
a pointed cotton swab to lightly line the lower lashes with
your eyeshadow. Curl lashes and apply mascara to the top
lashes only.
If you want eyes that are lined and defined, sort of a modern
day Cleopatra look, there is a natural
way to do it.
1...Use a light peach eyeshadow and sweep the shadow from
lashline up to the eyebrows. This gives the
eye a base...
2...Using a taupe or beige shadow, brush it in the crease
and toward the browbone. Curl your eyelashes
at this point.
3...Using a liquid liner, work from thr inner corner of the
eye to the outer corner. You can go straight
across or give
yourself a little more exotic look by slightly raising the
edge of the line
upwards a little. Start out with a thin
line and add to it if you want it a thicker line. Apply
mascara. Keep your blush and lips light and neutral to make
your eyes stand out even more with this look...
|