The Knot Bearing Cord:
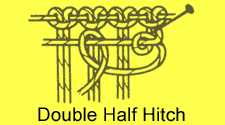
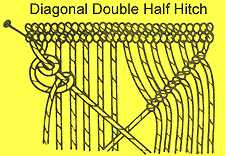
It's also important to grasp the concept of a knot-bearing cord. Knot-bearers are not used
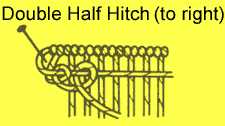
to make knots; they are used to knot on. If you hold the knot-bearer on an angle, and use the other cords to double half hitch
onto it, then you will have made a diagonal line of knots (see the Diagonal Double Half Hitch illustration). Change the angle
of the knot-bearer and you'll change the pattern of your work.
The Macrame Board:
You'll need to make a macrame board to pin your cords to while working. You can buy one if you'd
like... but you're too crafty for that. Just cut 4 pieces of cardboard to the same dimensions (my board is 10"x24") and tape
them together. Voila, macrame board! To keep your cords steady while working, pin them to the board using t-pins or straight
pins with a bent head. I bent the back end of my pins to form an "L" shape and used those. Unpin your work and move it higher
up the board as necessary.
Cord Lengths:
There is no precise way to determine how much cord you will need for a specific project, as the variables
are many: length of finished project, thickness of cord, and types of stitches are but a few. A safe approximation is to cut
4 times the finished length- so if you want your belt to be 30" then cut each strand at 120". It's better to estimate upwards,
as cord is cheap and it's easier to cut off longer strands than to add new ones in- though it can be done. For this project
I measured loosely around my waist and added approximately 10 inches for the fringe, then cut each cord 4x that length. You
will use 5 cords (each one doubled over) for each side of the belt, so cut 10 cords total.
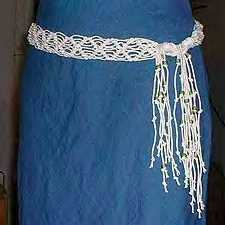
Macrame that Belt:
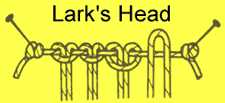
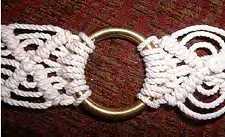
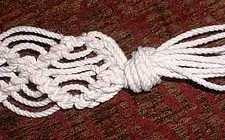
Using lark's heads knots, attach 5 cords to one side of the brass ring.
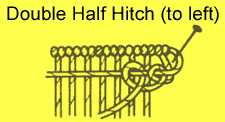
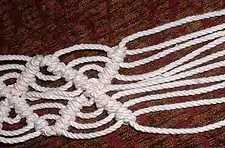
Beginning on the left side of your cords, and using the left-most cord as knot-bearer (hold the knot-bearer on an angle),
make four diagonal double half hitches. Repeat in reverse starting from the right side of your cords. Your knots should now
form a "V" shape, which is the bottom half of a diamond. Keep the knot-bearer at the same angle and reverse the direction
of your double half hitches so that you are now making the top part of the next diamond.
Continue angling the knot-bearing cords in a diagonal direction, and double half hitching over them, to form a continuous
diamond pattern. You will keep repeating the same knot in a forwards and backwards direction to form the belt.
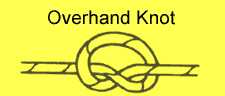
When the first half of the belt is the length you want it, begin working on the second half. Make a secure overhand knot
at the end of each side of the belt, then knot and bead the fringe as desired.
A Note on Customization:
For this belt I used cotton twine and a brass ring from my local hardware store. You can
achieve any look you want using different materials- satin cord would look fab, as would faux leather or colored rope. I also
decided that I wanted a belt that tied on my hip, so I made the brass ring the center of my belt (rests on one hip) and worked
out in both directions from there. If you want a wider belt use wider cord, or more strands, or make a looser weave. Reverse
for a narrower belt.
Tips
- If you want to include beads in your design, thread them onto your cords before you begin knotting and as
you work slide them up into place.
- If your cords are long (and for a belt they will be), wrap each cord around two fingers in a figure-8 pattern and secure
with a small rubber band. The cords will be much more manageable to work with, and you can just pull out more cord as you
need it.
- To make a necklace or bracelet, simply work with finer cord (waxed linen is fab for this) on a smaller scale. For a
dog collar/leash use thick cord such as heavy-gauge hemp twine, and a tight stitch such as square knot.