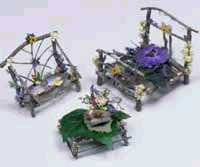
FAIRY CHAIR
Make miniature furniture from twigs, flowers, and leaves.
Getting Started :
This miniature furniture adds a charming country look to any place it is displayed.
What You Need:
~ 12 reasonably straight twigs (under 1 foot long) of varying widths to form the
seat frame and legs
~Curling or twisted twigs for decorating a chair back
~Small dried flowers, such as pansies, hydrangeas,
or creeping zinnias
~Lichen, dried
~Tweezers
~Bypass clippers
~Hot-glue gun and hot-glue sticks
Tips:
Twigs should be dry.
Don't use green wood; it shrinks and the bark comes loose, which
will cause your furniture to collapse. Look for wood with notches; other branches and flowers will fit naturally in the grooves.
The thicker the twigs, the easier it will be to make the chair. Use sharp clippers for accurate cutting and to prevent wood
from crushing. Always make sure glue has dried before moving on to the next step.
Instructions:
1. Assemble legs and seat.
Cut four equal-size twigs (2-3 inches in length); arrange and glue them into a square. (Hold the twigs together until
the glue dries.) Select slightly thicker twigs for the legs of the chair to provide balance. Measure before you cut to ensure
that all four legs are the same height (2-3 inches), or your chair will rock. Hold each leg perpendicular to your work surface,
place glue on the top, and then press a corner of the seat frame into the glue. For support, add leg braces (approximately
the same size as the twigs used for the seat) by gluing slightly thinner twigs to the chair legs, either diagonally across
or parallel to the chair seat. It's easiest to glue the braces to the outside of the legs, about halfway down the leg.
2. Build the back.
Use one straight twig and one slightly curved one. Glue the straight twig to one corner of the seat frame. Glue the curved
twig to an adjoining corner so it curves naturally across the straight twig. For added support, select another twig, cut it,
and glue it to fit horizontally between the other two seat-back twigs.
3. Make the arms.
Cut two small armrest supports (approximately 1-inch-long twigs), and glue them to the two remaining corners of the seat
frame. Choose two more twigs (1-2 inches long) for the arms. Glue one end of each arm to the armrest support and the other
end to the back of the chair.
4. Attach decorative pieces.
Use thin, odd-shape pieces of twig to fill in the back of the chair. It's up to you to choose twig size, width, and how
many are needed. Be creative with your designs. Glue twigs in place as desired.
5. Fill the chair seat.
Use four or five more small twigs to fill in the seat frame. In some cases, you'll need to split twigs in half to make
them lie flat on the seat. Place glue on the seat frame and, to prevent crushing your chair, use tweezers to hold the little
twigs in place until the glue dries.
6. Finish.
Decorate the chair with pieces of dried flowers and bits of lichen. Apply small amounts of glue with the end of a toothpick.
Use small dried flowers and foliage, such as creeping zinnias, individual lilac or hydrangea buds, bluebells, pieces of grass,
dogwood blossoms, pansies, Tea roses, and pieces of statice.
Once you start making this furniture you might not
be able to stop! The possibilities are endless!